The inspector
The inspector is the panel on the right of Studio. It shows the settings of whatever you've picked: a layer, a folder, or the scene itself. This page covers how it's laid out, every kind of setting you'll meet in it, the small buttons beside a setting, and the settings every layer shares.
Try it: Long Horizon (a scene's canvas and how it fits), Constellations (text layers naming the stars), Snowfall (a clock face set in Outfit).
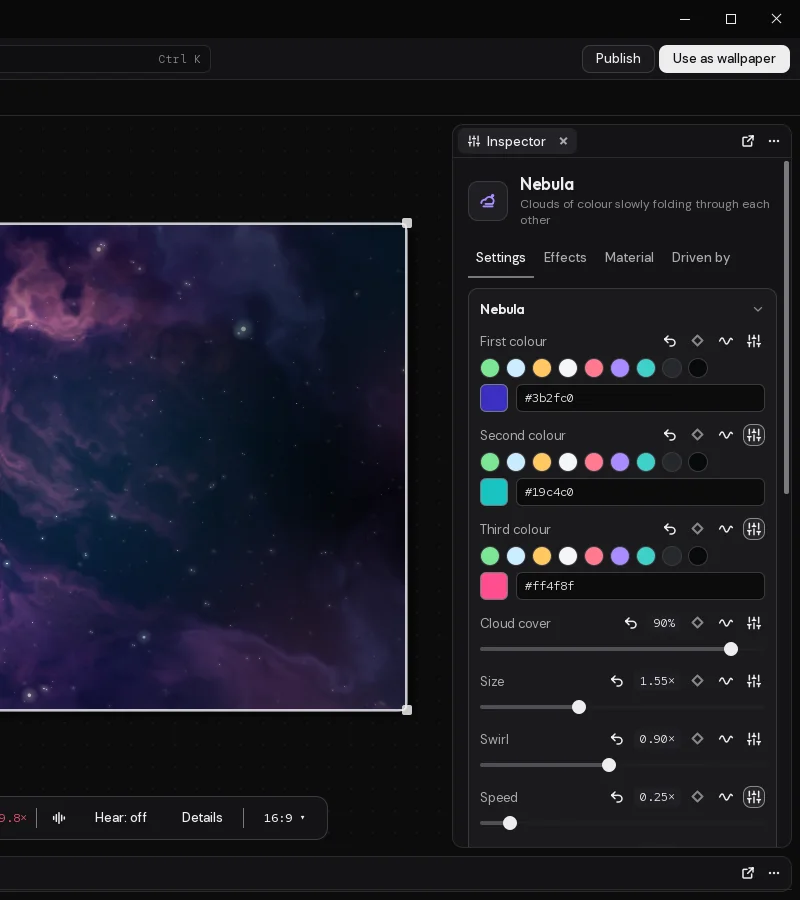
What's at the top
The picked layer's name and what its kind does.
Under that, a layer has four tabs:
- Settings: the layer's own settings, then the ones every layer has.
- Effects: the quick effects and the effects stack, with how many effects there are. See Effects and masks.
- Material: a shader the layer's pixels go through. See Materials and shaders.
- Driven by: every setting of the layer that moves, and what moves it, with how many there are.
A folder and the scene have their settings only.
Cards
Settings come in cards, by group: a layer's own groups first, then Layer, Placement, Motion, Interaction and Mask. Click a card's title to fold it away or open it. The groups every layer shares start folded, except Layer.
Every kind of layer lists its settings in the layer reference, with what each does.
The kinds of setting
Slider
A number between two limits. Drag it; the value shows on the right. Double-click the value to put it back to its default.
Colour
A row of Motion's colours (Green, Ice, Amber, White, Rose, Violet, Teal, Graphite and Floor), and a box for any colour as #rrggbb.
Colour with alpha
Like a colour, with an Alpha slider for how see-through it is. The box takes #rrggbbaa.
Choice
A row of buttons when there are four or fewer, otherwise a list to open.
Switch, text and file
A switch is on or off. A text box takes words; in a Text layer, {time}, {date} and the like are filled in. A file setting shows the file's name and Choose… to pick another; dropping a file from Assets fills it too.
Whole number and seed
A whole number has a slider and a box. A seed is the number a layer's randomness starts from: the same seed gives the same pattern every time. New seed picks another.
Any number box can be typed in, or dragged sideways to change it; hold Shift to drag finer.
Range
A low and a high value: two handles on one slider, and a box for each ("to"). The low one can't pass the high one.
Vector and point
Two, three or four numbers side by side, marked X, Y, Z and W. A point is a place on the screen: 0 is the left or top edge, 1 the right or bottom.
Gradient
Colours on a bar. Click the bar to add a colour, drag a stop to move it, double-click a stop to remove it (a gradient keeps at least two, and holds up to 16). Pick a stop to change its colour in the box under the bar. Blend is how the colours mix between stops: RGB, OKLab (even, natural blends) or Steps (no blending, bands of colour).
Curve
A line on a graph, for how one thing follows another. Drag a point to move it, double-click to add one, right-click a point to remove it (up to 32). The buttons under it set a whole shape: Straight, Ease, Rise, Fall, Hill, Flat. Smooth rounds the line through its points; off, it goes straight from point to point.
Flags
A row of buttons, any of which can be on at once.
Palette
Up to eight colours. Click one to change it in the box, + adds one, − takes the picked one away.
Font
A list of the fonts Motion carries, each shown in itself.
Layer
Another layer in the scene, from a list, or None. It's how an effect is limited to where another layer is (see Effects and masks).
Date and time
A moment, typed as 2026-12-31T23:59, or a date alone as 2026-12-31. The Real sky uses one to show the sky at a fixed moment instead of now.
Event
A name: letters, digits, spaces, _ and -, up to 64. It's what a script or a visual script sends and listens for.
The rest
Some settings have editors of their own, covered on their own pages: a Shader layer's code and a layer's Material (Materials and shaders), a Particle system's emitters (Particle systems), a 3D scene's objects (3D scenes), a web page or a web project's files (Web pages and projects), and a Paths layer's lines (Layers and folders).
The buttons beside a setting
The diamond: keyframes
Beside sliders, colours, whole numbers and colours with alpha. It adds a keyframe at the playhead with the setting's value, or takes away the key that's there. Filled, there's a key at the playhead; outlined in colour, the setting has keys elsewhere. See Keyframes and the timeline.
The wave: moving on its own
Beside sliders and colours. It makes the setting move on its own, back and forth over a few seconds, or follow the sound or one of the scene's sensors. Click it again to stop it. See Keyframes and the timeline.
The diamond and the wave are on a layer's settings, not the scene's.
The sliders icon: offering it to the desktop
Beside most kinds of setting. It offers the setting in the wallpaper's settings, so whoever uses the scene can change it in Motion Player, or in the desktop's own wallpaper settings, without opening Studio. Lit, it's offered; click again to stop.
Sliders, choices, colours, colours with alpha, whole numbers, seeds, ranges, vectors, gradients, curves, flags, palettes, fonts and dates can all be offered. The scene's own settings can be offered too: pick Scene and it tells you how many settings are offered so far.
On the Publish page you put the offered settings in order and in groups, give them labels and help, and narrow a slider's limits. See Publishing.
On a material's settings
A setting a layer has from one of the scene's materials shows a dot when the layer has a value of its own, and an undo button, Back to the parent material's value. See Materials and shaders.
What every layer shares
These cards follow every layer's own settings (a folder has none of them).
Layer
- Opacity: how much of it shows.
- Blend: how it mixes with what's under it. Normal covers it; Light adds the layer's colour to what's under it, so it glows; the others lighten (Screen, Lighten, Colour dodge), darken (Multiply, Darken, Colour burn), add contrast (Overlay, Soft light, Hard light), compare (Difference, Exclusion, Subtract, Divide), or take only one part of the colour (Hue, Saturation, Colour, Luminosity), as image editors' blend modes do.
- Bloom: how much this layer blooms, 0× to 3×. Its own glow (a glow orb's halo, a star's, a clock's) is times this, and so is what it adds to the scene's bloom: at 0× it adds none, at 2× twice as much. Layers that blend with what's under them, and drawn ones (text, shapes, clocks), keep their share of the scene's bloom and change only their own glow.
- Layer speed: how fast its own time runs, 0× to 4×: its motion, its keyframes, its particles, its shader's clock and a video's speed (a video plays between a quarter and four times as fast). At 0.5× it's where it would be at half the time; at 0× it holds still. A kind's own Speed (stars, rain, waves) still sets how fast it moves; this runs its time faster or slower on top.
All four can be offered in the wallpaper's settings like any other setting.
Placement
Left and right, Up and down, Size (up to 300%) and Turn. Dragging the layer on the preview sets these. See Layers and folders.
Motion
Movement every layer can have, on top of its own:
- Drift: wanders slowly around its place.
- Pulse: fades a little and back.
- Breathe: grows a little and back.
- Sway: rocks from side to side.
- Spin: turns, in degrees a second.
They go at the layer's Layer speed.
Interaction
- Depth: shifts as the pointer moves, as if nearer or farther than the screen.
- Follow the pointer: moves towards wherever the pointer is.
Mask
Fades the layer out by a shape: Round, Band across, Band down, or Fade the top, bottom, left or right, with its Size and Softness. For more than this, use the masks on the effects stack: see Effects and masks.
Quick effects
On the Effects tab: water, wave, glitch, pixels, blur, colour split, hue, saturation, brightness, contrast and tint. See Effects and masks.
The scene's settings
Pick Scene at the top of the Outliner, or the Scene tab at the top of the inspector, for the whole wallpaper:
- About: its Name and Description.
- Canvas: the size it's made for. Dynamic is laid out for any screen's shape. Or pick a size, grouped by shape: 16:9 from 1280 × 720 to 7680 × 4320, 16:10, 21:9 and 32:9 ultrawides, 4:3, portrait monitors, phones, tablets, square, several screens side by side, and Spanning all my screens, the size of your screens as they're arranged. Or type a width and height of your own, 240 to 16384 pixels each way; the turn button swaps them. The pane shows its shape (16:9, 21:9, 9:20…) and how many pixels it has, and the preview takes its shape, with the size shown above it.
- On a screen of another shape, for a canvas of a fixed size: Fill covers the screen and cuts off what overhangs (a 16:9 scene on a 21:9 screen loses some of its top and bottom), Fit shows all of it with black bars beside it or above and below, and Stretch pulls it to the screen's shape. The nine squares say where it sits: the middle, or kept to a side or a corner. A small picture shows the canvas on the preview's shape; pick another shape under the preview to see it there.
- Bloom: Bloom strength (bright parts bloom over everything), What blooms (lower makes more of it bloom) and Bloom spread. Let people change this, on from the start, offers the bloom on the scene's page in Motion as a Bloom slider; switch it off to keep the bloom as you made it. What blooms and Bloom spread can be offered too, with the sliders icon beside each.
- Finish: hue, saturation, contrast, brightness, a tint, Colour split at the edges, Film grain and Scan lines, over the whole picture.
- Interaction: Clicks make ripples across the whole picture, and Pointer smoothing, how gently things that follow the pointer catch up with it.
- Script and Visual script: the scene's logic. See Scripts and Visual scripts.
- In the wallpaper's settings: the settings offered to be changed without opening Studio (the sliders icon beside a setting), each with where it's from; the target picks its layer and the cross stops offering it.
Each group says what it holds while it's folded ("2 changed"). Beside a setting, in the same places for every kind of layer: the reset arrow (when it isn't at its default) puts it back, the diamond adds a keyframe, the wave makes it move on its own or with the sound, and the sliders icon offers it in the wallpaper's settings.
The Sensors tab
The Sensors tab, beside Layer and Scene at the top of the inspector, lists the sensors the scene listens to: a heart rate, steps, anything a device sends. Each has its Sensor, the Readings from and to it spans, its Smoothing, where it rests Before a reading, the name it's Shared as, and Simulate, for made-up readings in the preview. Used by lists the settings that follow it and the text that shows it. Listen to a sensor adds one. See Sensors and watches.
Driven by
The Driven by tab lists the picked layer's settings that move: by keyframes ("3 keyframes"), on their own ("Moves on its own, every 6.0 s"), with the sound ("Follows the bass") or with one of the scene's sensors ("Follows pulse"). Change goes back to Settings to change it; the cross stops it moving.
Last changed 2 November 2026. Something wrong here? Tell us.