Materials
A material is a shader a layer's pixels go through on their way to the screen: glowing edges, a hologram, a colour that pulses with the bass, a picture that ripples. Any layer can wear one. You can write a material in GLSL or build it from nodes, and Studio builds it as you go.
Try it: First Light (an aurora built from nodes, with sound in it), Resonance (rings from nodes that read the spectrum), Molten (lava from nodes), Pulse (a heart from nodes, beating with a watch), Valley Hours (a shader that reads the clock), Rain Harbour (a whole harbour in one shader).
Giving a layer a material
Select a layer and find its Material setting in the inspector. With none, it says "None".
- Use material… opens the picker. In this scene lists the materials the scene keeps; Library lists the ones in your library and the ones Motion comes with. Pick one and click its Use.
- New starts a material of your own and opens it in the editor. It starts out showing the layer as it is.
- Edit opens the layer's material in the editor. The trash button takes it off again.
A material's settings appear in the layer's settings under Material settings, like any other setting. You can animate them on the timeline, make them move on their own or to the music, offer them on the desktop, and change them from a script (a material's setting tint is the layer's setting m_tint).
The editor
A material or a Shader layer opens in the shader editor, as a tab of the scene named after it, in the row under the toolbar. The Materials panel lists the scene's materials and Shader layers to open, and New material.
The switch at the top shows Code, Nodes or Both side by side. The editor builds the shader half a second after you stop typing; Build (Ctrl+B) builds it at once. The status beside it says Built, Building… or how many problems there are. While there are problems, the layer keeps showing the last version that built, so the preview never goes blank.
Like the script editor, it fills the window under the tabs, with the material's preview at the top left and its details under it, and F11 has it fill the screen. Its code can open in an editor outside Studio too, as a script's can (Scripts). The save button keeps the material in your library, for any layer of any wallpaper. Your library is in %LOCALAPPDATA%\motion\library\materials on Windows and ~/.local/share/motion/library/materials on Linux.
Writing one in code
A material is GLSL with a Shadertoy-style mainImage. fragCoord is in pixels from the bottom left; fragColor is what you give back. The layer itself is iChannel0, and lib_layer(uv) gives you its colour and alpha.
// the layer, washed towards a tint that swells with the bass
void mainImage(out vec4 fragColor, in vec2 fragCoord)
{
    vec2 uv = fragCoord / iResolution.xy;
    vec4 me = lib_layer(uv);
    float wash = amount * (0.5 + 0.5 * iAudio.x);
    fragColor = vec4(mix(me.rgb, tint, wash), me.a);
}
amount and tint here are the material's settings. Add them with + Number and + Colour beside the code, give each a label and, for a number, its range (from and to). The code reads each one by its name: a number is a float, a colour a vec3. A material can have up to eight numbers and four colours (a point counts as two numbers, a vector as three).
Start from… offers shaders that already work (Flowing light, Glowing cells, Tunnel of rings, Ripples where you click, Bend a picture, Bars that follow the sound) and what you've kept in your library.
What the code can read
| Name | What it is |
|---|---|
iTime, iTimeDelta, iFrame | the time in seconds, the seconds since the last frame, and the time in sixtieths of a second (a frame at 60 a second) |
iResolution | the layer's size in pixels (.xy) |
iMouse | the pointer, as on Shadertoy |
iPointer | the pointer, 0 to 1 from the top left |
iClick | the last click: x, y, seconds since, and 1 if there's been one |
iDate | year, month (0 for January), day, and seconds today |
iAudio | the sound: bass, middle, treble and level |
iBeat | the beat: pulse, count, and seconds since |
iChannel0 | the layer itself |
iSound | the sound as a picture, which lib_spectrum and lib_waveform read |
There's a library of functions too, all starting lib_: the sound (lib_spectrum, lib_waveform, lib_band, lib_bars), noise and patterns (lib_noise, lib_fbm, lib_ridged, lib_voronoi, lib_hex, lib_stars, lib_plasma), shapes (lib_circle, lib_sdBox, lib_sdStar, lib_smin) and colour (lib_hsv, lib_hueShift, lib_palette, lib_blend, lib_tonemap). The panel beside the code lists them all under What the code can read.
Errors are underlined on their lines as you type, and completion offers your settings by name.
Building one from nodes
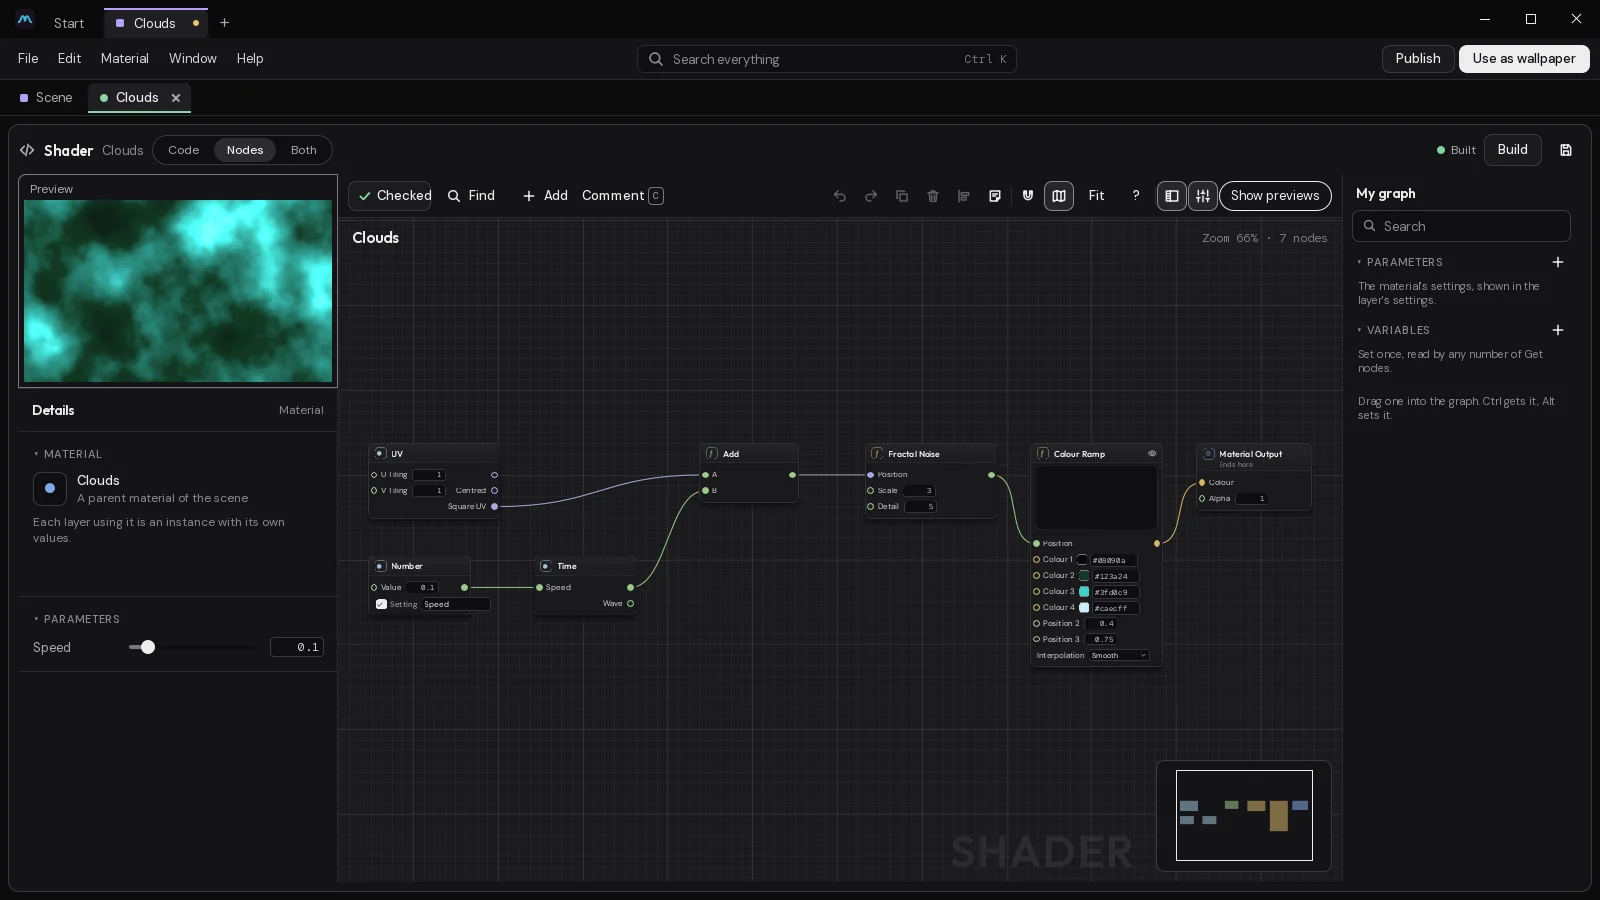
Pick Nodes at the top. A new material starts as a small graph: UV into a Sample Texture of the layer, its colours turned by Hue Shift over Time, into the Material Output.
The editor works like the visual script's: Tab or a right-click searches every node, you drag wires from pin to pin, and My graph on the left holds the graph's parts. The difference is that a material's wires carry numbers and vectors, worked out for every pixel, and there are no events.
Studio's material nodes are named as node-based shader tools such as Unity's Shader Graph, Blender and Godot name them: Lerp, Smoothstep, Fresnel, One Minus, Remap, UV. If you've built shaders from nodes before they'll be familiar; the ones those tools haven't got are named for what they do. The node search finds each by its name.
- Material Output is what the layer shows: its Colour, and its Alpha.
- Sample Texture reads the layer under the material.
- The rest are in groups: Parameters, Constants, UV, Time, Input, Audio, Math (such as Lerp), Math|Trigonometry, Math|Vector, Utility, Texture, Colour (such as Colour Ramp), Procedural|Shapes, Procedural|Noise (such as Noise and Fractal Noise), Procedural|Patterns, Shading and Post Process. Every one is in the material node reference.
Previews
Each node shows a small preview of what comes out of it, playing live, with the layer's picture and the sound. Show previews along the top turns them all on or off; the button on a node hides its own. To see what a single wire carries, put a Debug View on it.
Exposing a setting
There are two ways to give a material a setting:
- On a Number or Colour node, tick Setting and give it a name.
- In My graph, add one under Parameters (a number, a colour, a point, a vector or a toggle), then drag it into the graph for a Parameter node that reads it.
Either way it shows in the layer's settings, where it can be animated, offered on the desktop and changed by a script. Variables in My graph are different: a Set Variable node works one out once, and any number of Get Variable nodes read it.
Nodes and code together
The nodes write the code. With Both open you see it change as you wire. That code is read-only while the nodes own it; Unhook keeps the code and lets the nodes go, so you can carry on by hand.
Going the other way, a material written by hand has no nodes. Picking Nodes asks first: Build from nodes replaces the code with what the nodes write (undo brings it back), and Keep my code leaves it alone.
Frame boxes and notes (a Note too) work as they do in the visual script: C boxes what's picked, Shift+C puts a comment on a node.
The scene's materials and instances
A material can belong to one layer, or the scene can keep it once for many layers.
On a layer's Material, Make instance moves the material into the scene's materials and makes the layer its first instance. Other layers can then use it from Use material…. Using one from your library does the same: the scene keeps one copy, however many layers use it.
An instance shares the material's code and gets values of its own: the same glow, a different colour on each layer. In the editor's details, a dot marks a value that's the layer's own, and the arrow beside it puts the parent's value back.
- Edit parent changes the material itself, and every layer that uses it changes too.
- Make unique copies the material into this one layer, to change it there only.
A scene can keep up to 64 materials. One of them can itself be an instance of another, with values of its own.
The materials list
The scene's materials (in the Materials panel, the command palette, or the sliders button on a layer's Material) lists them all. Each row shows how many layers use it. You can rename it, Edit it (on the first layer that uses it), duplicate it, save it to your library, or delete it. Deleting one that's in use asks what its layers should switch to: another material, or none.
The Assets panel has the same list under Materials, with + for a new one and From your library…. Each one's menu also has New Shader layer with it.
The Shader layer
A Shader layer is a layer that is only a shader: it draws its own picture rather than changing a layer's. It's edited in the same editor, written or built from nodes, and reads the same inputs.
Its settings:
- Shows as: Covers (it hides what's under it), Alpha (its own alpha), Dark clear (dark parts are see-through, good for glows) or Light (it adds its light to what's under it).
- Picture for iChannel0: an image the code reads as
iChannel0, if you want one. - Resolution: draws at fewer pixels and scales up, which is lighter for soft shaders.
A Shader layer can also draw one of the scene's materials as its code: Use material… under its code. It's then an instance, with values of its own, and Make unique gives it its own copy. Its settings are the layer's settings like any other (a Shader layer's setting speed is u_speed to a script).
Shadertoy shaders mostly work as they are: paste the mainImage in and add the settings it reads.
A shader's loops have a limit, the same for every scene: all of them together take at most 16,384 steps for each pixel. A loop takes one step each time round, or more when what it runs each time round is long (a step for every 64 or so words and symbols of code, counting the functions it calls), so a short loop can go round 16,384 times and a heavy one fewer. A loop that never ends stops at the limit, so the picture is still drawn and the screen never freezes. Code that does far too much without looping, such as functions that call each other many times over, is refused when the scene loads, and so is code longer than 256 KB.
A shader that holds the graphics card too long is stopped, and the rest of the scene carries on without it:
- A frame whose shaders take the GPU more than a quarter of a second is heavy. Once heavy frames have held it for half of the last twenty seconds (eight of them at least), the heaviest shaders stop being drawn for ten minutes, as many as it takes for the rest to fit.
- One shader that takes more than a second and a half in a single draw, three times within twenty seconds, stops being drawn for ten minutes at once.
- When the graphics driver has to reset the GPU after a hang, the shaders that had been drawing for a second or more are each counted. One counted twice within a week isn't drawn on that computer until a week after the second time (changing its code starts it afresh). A scene counted twice within a week has none of its shaders drawn for that week, however many there are, and changing them doesn't lift that.
- A moment of a busy GPU never stops one, and a reset that wasn't a shader's doing, such as a driver update or the computer waking from sleep, counts against none.
Studio's console, and the wallpaper's log, say what was stopped and why.
The only #extension lines a shader may have are GL_ARB_gpu_shader_fp64, GL_EXT_control_flow_attributes and GL_ARB_derivative_control, and the only other lines starting # are #version, #line, #pragma and the preprocessor's own (#define, #if and the like). #include isn't allowed.
For blurs, colour grades and the rest of the effects stack, see Effects and masks.
Last changed 2 November 2026. Something wrong here? Tell us.